
AMATEUR PEWTER REPAIRS
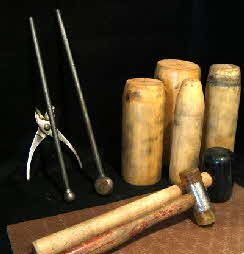
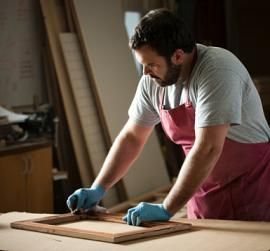
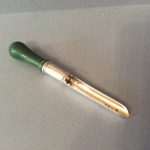
The illustration shows (above) – 4 wooden rim straighteners (gill, 1/2 pint, quart) 6-8 inches long each of them, 2 rubber or composition hammers, fabric to hammer against between hammer and pewter piece – actually a scrap of brown table protector – pair of pliers with some of said fabric glued to jaws (and well used now),two rods – one with a ball bearing ending welded to the rod (used for knocking out dents in mugs from the inside), one with a disc – this shape is useful for footrims (as well as dents)
Books might tell how to make a tea pot or jewellery but not how to effect simple repairs. I have been trying to do these repairs with clues picked up from various contacts. With no DIY background and no natural aptitude or previous experience, nevertheless set out hereunder is what I have found and others are welcome to offer corrections or further guidance – which can be passed on to all those interested.
From the queries received in revamping my collection it was apparent that a lot of collectors would like to know more. This was especially brought to mind by an Australian correspondent who had a delivery which arrived having been dropped badly and was clearly without information as to how to try to solve the problems.
Alex Neish (an important collector and authority) recently wrote that the definitive articles on repairs were those by Stanley Shemmell in the 1983 issues of the journal. Those articles dealt with hot metal work and the preparation and finishing for that work. Not having reached that stage yet – the basic repairs this article concerns itself do not involve solder work or similar hot metal work. Whilst those instructions were good, many collectors would welcome a demonstration they could watch.
Who is Albert Bartram (a past president of The Pewter Society and perhaps the only remaining pewterer – though now over retiring age – working with early Pewter) going to pass his skills to? For who else is able to effect quality repairs? Perhaps he would consider his role in Pewter – as a celebrity chef might to cooking – in say organising paid day courses on pewter work. Many members may be very interested in learning from him.
Early Warning! – a leading author and collector over many years on reading this article commented on those Flaky oxided Plates and Mugs etc as follows –
The issue about flaking oxide is that not everyone will start with electrolysis, and could then find that having pushed, squeezed and variously hammered their pewter, they now have a dismal looking items with grey scars where the oxide has come away. I learnt this the hard way, and would not want any well intentioned advice to cause others to suffer!!
STARTING A REPAIR
Often but not always it is useful to make the pewter really warm. This can be done by standing the piece on a wooden disc in a pan of water and bringing it to the boil. Gardening or welding gloves are needed at first to handle it but the whole process makes the pewter more malleable and less likely to crack. It is then surprising with some metals how they can be manipulated by hand, especially using the pressure of thumbs on rims, dents, etc. It is not essential to most of what is done but sometimes it really helps. If water gets in a handle then held the right way over kitchen paper it will drain out and a hot air gun can dry mug interiors – the narrow edge between base and body especially also soft toilet tissue (more on that later) also removes moisture. (Hot air guns need to be kept moving as they can turn small areas into holes quite easily, and they don’t heat all of say a mug evenly as would the boiling water)
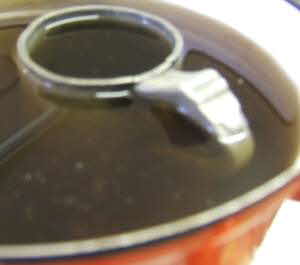
Photo of mug in pan of water
usually put the lid on and keep it more to the centre of the pan.
DIMINISHING A DENT IN A MUG
For the dent in the mug body – gentle and repeated tapping with the rod with the ball bearing end from within the mug, even using a thumb to push against the area will help the area to conform to the outer. It often leaves a mark on the outside but far less than the original and use of 2000 wet and dry can diminish this substantially.

Seen here are a variety of forms used by the late Peter Starling some of which may well have assisted him to deal with hollowware body shapes – assuming that you would put the affected area on the shape and push from the inside – often the body shape seems to naturally want to conform to its previous shape.
ROUNDING A FOOTRIM
 For this I use the rod with the oval disc on the end – it seems to spread the force on a larger area than the ball.
I soon found I scraped the bottom of the vessel with the side of the end so now use the protector fabric cut in a circle to protect the underside. (Two of the forms shown above may have helped PS with this).
The pliers with the protected grips will pull out a warmed folded rim, but if it cracked when it crumpled the split will then show and I have not yet discovered how to effect a straightened finish to that somewhat uneven rim without the use of additional hot metal (which is how it might be done) as any polishing or wheel work really simply shines or removes metal obviously.
TAKING THE LIP RIM BACK TO ITS ORIGINAL CIRCULAR SHAPE
The four almost bullet shaped pieces of wood (gill, pint, quart – 6-8 inches long) shown in the first illustration speak for themselves. Keep these well oiled with linseed oil so the surface works its way into the mug more easily. Tap them in and then tap the rim toward them thus straightening many a misshapen mug.
FINDING A POT TOUCH INSIDE HOLLOWARE

I was told that some wire wool or wet and dry fastened to say a toothbrush and poked about in the base would help to discover and reveal a pot touch. Well it didn’t go too well with this method. However if I attached a steel brush attachment to a flexible extension to my Dremel (an electric craft tool) the effects were really good and the base could be nicely cleaned revealing the pot touch without apparently damaging it. The Dremel is shown below and a pot touch for William Hogg that is not in October 2007 illustrated on the PS database that was found in the total gloom at the bottom of a nice half pint mug. (Size 0.32 inches across)
BENT PLATE EDGES – an untried suggestion
Put a plate in pan of water resting on a piece of wood between plate and base – bring water to the boil. When boiling you will have heated the metal which can easily be handled by thick gloves – welder’s gloves are good so are thicker gardening gloves doing this with mugs. Take the plate out and manipulate the plate edge with your fingers to as near shape as can do.
Next take a clamp and putting a thick fabric say felt between plate and jaws of clamp tighten the clamp and when tight enough leave for a while. The fabric must not be creased in the clamp jaws and must not have a distinctive weave or surface – maybe put a piece of fine cotton and then the felt in the clamp jaws underneath and above the plate surface.
This might restore the plate edge to some semblance of what you want – more heat and a little manipulation by hand and perhaps tapping plate with a rubber hammer with the plate turned upside down (again some cloth between hammer and plate – makes it difficult to see but avoids scarring/dinting.) Well that is what I would try and if it fails and you know someone who does it well – you will actually have done no damage and should have only lessened the problem not increased it.
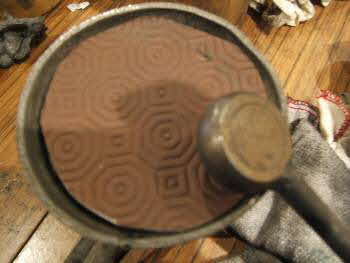
PLATE RIMS often respond well to a little gentle hammering on the underside with a rubber/composition hammer, again a bit of cloth between the hammer and the plate have helped.
ARALDITE
The subject of araldite brought a lot of laughter to a recent Pewter Society talk, however it can be most useful albeit with a slight twist to the method. Whilst following the instructions on the packet also add as much fine pewter (either very fine filings or sieved oxide) as the mixture can possibly take. In re-fixing a handle attachment this is then applied to the cleaned break, the surplus wiped off with kitchen paper or scraped off with the fine end of a pointed metal nail file and some pewter dust scattered to cover the sheen of the araldite pewter mix at the site of the repair. The elastic bands are put round to hold it together for 24 hours to set. After setting and removal of the bands then use the fine attachment shown with the Dremel which is a small steel brush to remove any surplus or dirty bits, clean up the join with finest wire wool or wet and dry and the repair is done and not apparent other than to a most experienced eye – which because of the presence of the pewter ‘dust’ is usually uncertain as to what has happened, if seen at all. Is this a deception or simply an attempt to improve and save?, no different to electrolytic cleaning perhaps.
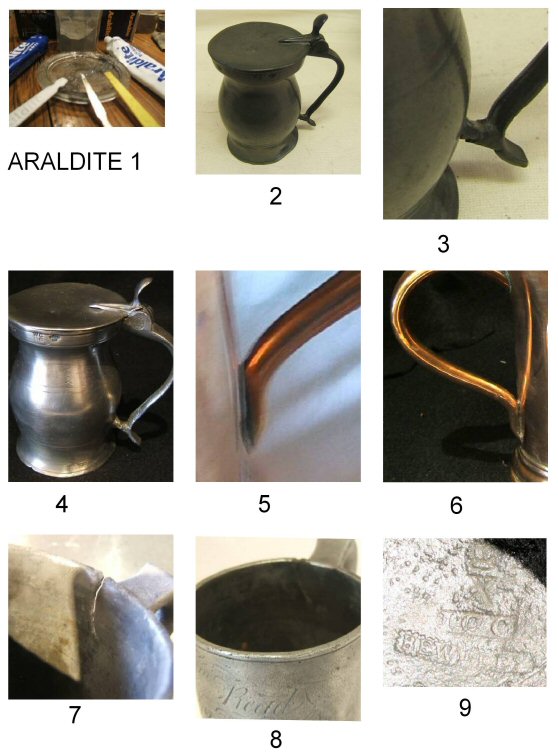
My photos show –
- Araldite ‘kit’ – tubes araldite, 2 plastic applicators and a small metal nail file, glass dish top, glass jar of fine pewter oxide
- Scottish flat lid measure lower handle attachment is actually broken
- Close-up of broken attachment
- After electrolytic cleaning hand polishing and araldite to reattach lower handle
- Handle of a copper measure detached from body at lower attachment
- Handle reattached on copper measure (used filings from plumbers copper pipe with the araldite)
- Bewdley Pint showing split at upper handle attachment
- Bewdley Pint showing split filled with araldite pewter mix
- Bewdley Pint showing previously totally hidden touch of crowned X over ICC over Bewdley label revealing rounding serrations to label not apparent on PS database, revealed by use of ‘Dremel’
POLISHING
After cleaning etc a piece needs a good polish. To help with the pewter patina oven black polish as used for example on Aga cookers enhances the patina. It also enhances engravings and marks by leaving a little black with any groove previously made.
A recent ATG had a feature on a retired member of Sotheby’s staff with responsibility for polishing the silver for auction presentation for the last seventeen years. The article gave two clues I have since found very useful.
1) When polishing use a blackened cloth (through long use) to first polish up
2) To finish use soft toilet tissue
Sometimes after both of the above, a scrap of good chamois leather polishing skin is useful for a final polish.
CONCLUSION – HELP NEEDED!!!!
This article has set out to suggest ways to improve the looks of our pewter. I have purchased odd grim pieces solely to practice on and have been (sometimes) favourably pleased with the result. I am always happy to be told how not to waste time, where methods can be improved, and also welcome offers of hot metal demonstrations. Then use could be made of the hot metal ladle shown in one photograph, and also Dremel do a really good gas blow torch (which repairs would provide an excuse to purchase).
This article aims to draw comment from those who might offer other clues towards improving neglected pieces. If there is sufficient interest it will be a pleasure to set out for readers, the replies and advice received. johnstephenbank@btinternet.com
Reader suggestions –
Pliers need covering with a soft cloth or plastic tips. Pre-heating helps with the harder alloys but boiling water doesn’t really do it for me. A smooth and rounded dowel (oak or hardwood) that has been oiled and secured in a vice so the tankard defect can be worked against the wood gently and persistently. The tankard is brought to temp. prior to working with a blowtorch moving constantly back and forth until the fingers inside detect the warmth. Leaded alloys ought to be easier to work with than Brit. metal alloys as the lead does improve malleability and stabilizes the metal from tearing. Practice pieces first!!
The worst defect is the lower handle terminal pushing in the tankard sidewall and I will take any suggestions on that one. I have been toying with an expandable antique shoe horn to get leverage from the opposite side of the tankard but pre-heating with the torch seems out in the handle area as the connection to the body is tenuous and susceptible to lower temps. than the main.
THE PATINA QUESTION AND VALUE – a frequently asked question
The Patina question has different answers depending on where you are. A leading expert in the UK only keeps for himself those very good pieces with a naturally very darkened patina (but not pitted or damaged). Others in the UK and AUS prefer them slightly (but only a little) polished – ie the grey/dark grey – glows.
In the USA many seem to like them absolutely clean to an almost burnished aluminum or a silvery look.
To see what I mean first find www.hiltpewter.com and enjoy their USA pewter website.
Then compare that with a UK based site www.antique-metalware.co.uk/shop.asp . Even in the UK I have one contact who likes his pewter to resemble silver and goes to extreme lengths to clean it like that both inside and out! He says that is what it was originally made to look like.
So I can give no definitive answer on taste or value. If you are thinking of selling; then to see what the market you might sell in pays better for, is always a somewhat simple answer – otherwise just please yourself, and enjoy your pewter the way you prefer it!
Credit: The Pewter Bank


